6

Problem

I want to install Android in a VM to restore a backup using Titanium Backup. For this to work, I need Android to be rooted.

What I tried

I've tried to install Android-x86 4.3 in a Virtualbox VM. The installation seems to work. I made an 8GB partition disk (sda1), made it bootable, and installed Android in it from an ISO file. This all seems to work. Android starts, I can browse the internet, install apps, etc. Then I want to restart the VM, and guess what?! I go back to the installation screen, like starting up from the ISO live image.

For normal stuff, I can make a snapshot, start that up, and do anything. My problem is that I need root permission to restore a Titanium Backup in that VM. And I cannot root this VM because the disk is not writeable. With Alt-F1, I become root and I can use a script to root Android. But my guess is that I'm still on the ISO and that is not writeable.

Update - another try with Android 4.2

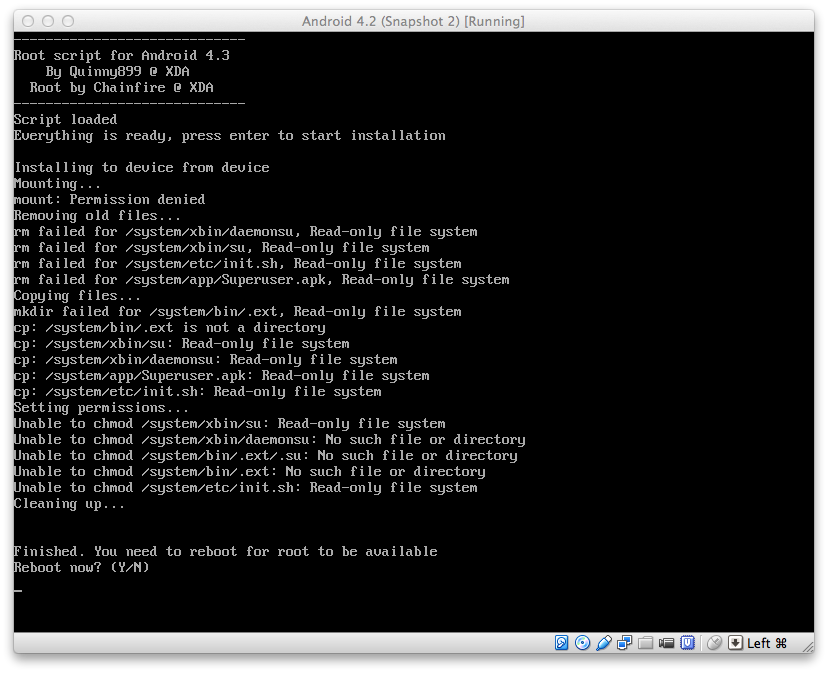
As mentioned in the comments, 4.3 would have problems with root access. I tried 4.4, which didn't start at all. Then I tried 4.2, which has the same problem as 4.3 for me. I made a screenshot of what I see when I try to run the rootscript, which is described here.

You can see the errors: rm failed - Read only filesystem

How can I fix this?
My question

How can I install Android permanently on this VM, so it can reboot and then be rooted?

7
  • If you're talking about Android-x86 in VirtualBox: It usually comes with root access. Except for the 4.3 image, which I also failed to get root access on. You might wish to try a different image then.
    – Izzy
    Commented Aug 31, 2014 at 15:29
  • I'm going to try 4.4. It does come with root access, but that only works for the terminal via ALT-F1. It does not mean that the apps can use root access.
    – SPRBRN
    Commented Aug 31, 2014 at 16:49
  • I've got 4.0 (ICS) running in a VM. It has /system/xbin/su as well as /system/app/Superuser.apk, the latter being for the apps part. Never checked 4.4, but doesn't it have these as well?
    – Izzy
    Commented Aug 31, 2014 at 16:55
  • I can't get 4.4 to start up. So I'll give 4.2 a try and hope that works.
    – SPRBRN
    Commented Aug 31, 2014 at 18:57
  • Aside from the rooting, why can't I reboot after installing? Why does it seem like I go back to the live image? Do I miss a step somehow?
    – SPRBRN
    Commented Aug 31, 2014 at 19:06

3 Answers 3

2

For your reboot problem, it sounds like your boot order is booting off the .iso, i.e., cdrom, before it looks for the disk partition where you installed Android. Shut everything down and disconnect the .iso. You can just delete the CD device under the controller within VirtualBox Settings->Storage. You probably shouldn't just change the boot order or you will have trouble reinstalling if you ever need to. However, if you want to change the order, look under Settings->System->Motherboard.

2

If you set /system as read-write, you won't have any problems at all.

In the installation, select "Yes" when prompted "Do you want to install /system directory as read-write?".

1

Step 1: Choose File > Close > Power off the machine. Start the Android VM again, but this time choose Advanced options > Boot from local drive > Android x86 debug mode.

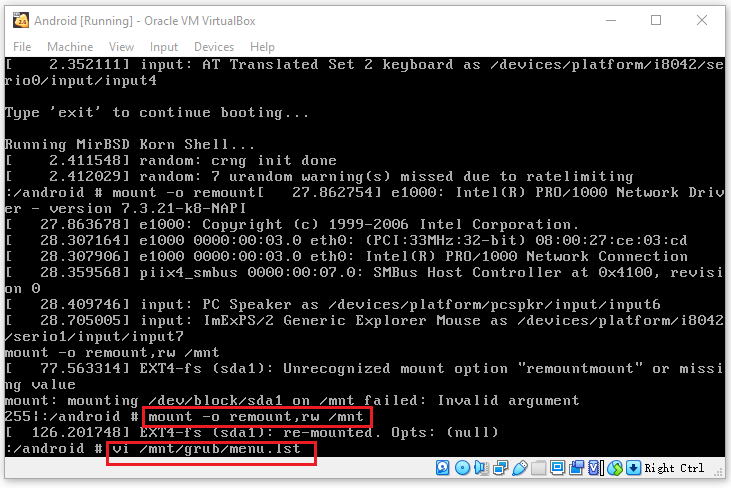
Step 2: Execute the following commands one by one to open the menu.lst file.

mount –o remount,rw /mnt
vi /mnt/grub/menu.lst

Source:Partiton Wizard

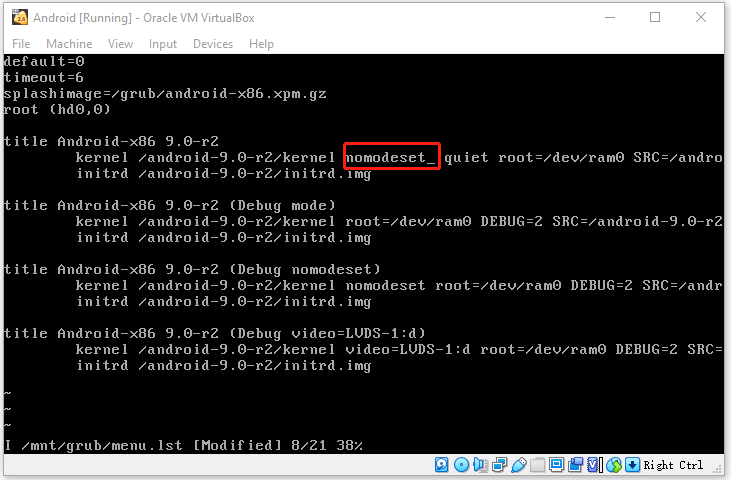
Step 3: After the menu.lst file is opened, press “i” key to enter the edit mode. Then, add “nomodeset_” before “quiet root”. After that, press “Esc” key to exit the edit mode. Then, press “:wq” and Enter to save changes and quit.

Source:Partiton Wizard

Tip: When I type the “:wq” command, I get the “:wq not found” error and I fail to solve the problem. I just continue to power off the machine and the method works still. If you also receive this error, just ignore it and continue.

Step 4: Choose File > Close > Power off the machine. Then, start the Android VM again and choose Advanced options > Boot from local drive > Android x86. Wait until you enter the GUI. Then, you will get the following picture. Please follow the on-screen instructions to set up Android.

Tip: Some people also report that they have solved the problem by going to Settings > Display, setting graphic controller to VBoxVGA, and then turning on or off the 3D Acceleration accordingly.

Source:Partiton Wizard

Credits : here.

New contributor
Bhupesh S is a new contributor to this site. Take care in asking for clarification, commenting, and answering. Check out our Code of Conduct.

You must log in to answer this question.

Not the answer you're looking for? Browse other questions tagged .