43

I won a Samsung Galaxy S6 Edge, signed into it with my Google account, played around with it, wiped it, and sold it.

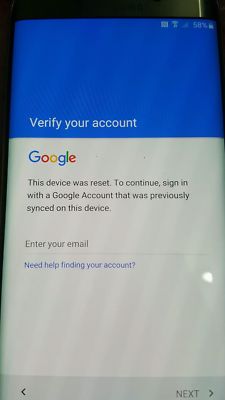
Now the person can't get past setup because it's saying he must log in with an account previously synced to the phone.

Is there anything I can do from my side to remove this lock?

screenshot

2

5 Answers 5

33

There are full guides for several devices from RootJunky on YouTube. This first method works on some Samsung and LG devices. Your user can probably start at step 4.

  1. Reboot into Recovery mode (hold Home, Volume Up, and Power, releasing Power when you see the device turn on/reboot).

  2. Perform a Factory Reset (press Volume Down until wipe data/factory reset is selected, press Power, scroll down to Yes -- delete all user data and press Power again).

  3. Proceed through the device Setup Wizard until it prompts you for the Google account credentials.

  4. For a Samsung device, save this RootJunky APK onto a USB flash drive, and connect it to the device via OTG.

    For LG:

    • Back up, connect to Wi-Fi, then back up again and hit Accessibility (Yes to the prompt that follows).

    • Turn "Switch Access" on, then enter its Settings and set a key for Overview, such as Volume Down.

    • Back out to Accessibility again, go to Vision → Talkback → Settings → Privacy Policy to open the browser, and download the APK linked above (rootjunkysdl.com → Apps).

    • Press the key you set up for Overview, hit Dual Window, and select the file browser.

  5. When the File Explorer launches, browse to and tap the APK to install it. When you get the prompt about unknown sources, choose the Settings option and enable the Unknown Sources option.

  6. Complete the install and choose to Open the application, which will open Settings.

    For LG:

    • Add a new user account under Users, switch to it and add your own Google account via Setup, then switch back to the main user (Owner) from Settings → Users, and back out from there to the main Settings.
  7. Go to Backup and Reset and do a Factory Data Reset. As per my other answer, this will remove FRP from the device.

The APK in (4) is very simple and just opens Settings, you could use any other that does the same if you don't want to trust that source.


Nexus 5, 5X, 6, and 6P running 6.0.1; Goclever Quantum 2 400S running 5.1:

Insert an activated SIM card and call it from another phone. Answer the call, hit the Add Line (call conferencing) button, and enter *#*#4646#*#* or *#*#4636#*#* (worked on Nexus 5X). Tap "Usage Statistics", then hit the back button, and you're in Settings and can do a factory reset.

If Factory Reset is disabled thanks to a security patch, you can instead create a new user account (going through and setting it up), then follow the very next guide below for the Turbo, starting at the second paragraph.

You can also do this without a sim through this exploit.


Motorola Droid Turbo running 5.1:

Go through the Setup Wizard until you encounter the "About your privacy" page (you might need to connect to Wi-Fi). Hit the "Privacy settings" link, then "View Motorola Privacy Policy". On that page, select any text and hit the Search button, which will open the browser. Type Settings into the address bar, and tap the suggested Settings app.

Enable developer options (by tapping the version code in About Phone seven times), then go into Developer Options and turn on USB debugging. Connect your device to a PC with ADB installed (from here) and run this in a shell window:

adb shell content insert --uri content://settings/secure --bind name:s:user_setup_complete --bind value:s:1

Now you can go into Settings and do a Factory Reset.


Motorola Droid X Pure running 6.0:

Navigate through the Setup Wizard to the Wi-Fi connection screen, and select a password-protected network. Select "Show password", then type in a password and select the password text. Hit "Share" in the menu that pops up and select Gmail. Add a POP or Exchange account (not a Gmail account), and (from the message pre-populated with the text you "shared") select Settings from the 3-dot menu and then choose "Manage accounts" from that same menu.

You should now be in the Settings app. Follow the above Turbo guide starting at the second paragraph, and you're done!


For devices where none of the above or similar methods work, or after these exploits are fixed, see my other answer.

4
  • 5
    The rootjunky link is broken. please fix it.
    – LN6595
    Commented Oct 29, 2017 at 22:36
  • With latest updates, Nexus 5X doesn't allow Add Call for conferencing. So it doesn't work
    – djibe
    Commented May 14, 2020 at 16:41
  • I managed to remove the FPR from a Huawei P8 lite (PRA-LX1) on Android 8, with the method using « Share » to access the phone settings (similar to the one described above for Motorola Droid X). I replicated exactly the steps of the following video: youtu.be/MX_6iKveFqE?si=koq0J5iWEhqHmr6d
    – YAG
    Commented Nov 12, 2023 at 10:00
  • 1
    Pretty much all these exploits have been patched since 2017. You may have luck with devices with an older security patch. For those on a journey with an LG device like I went on today. You should look at using the 'LGUP' tool and Download mode (volume up), which will properly reflash the device, including the FRP section. Worked for my Nexus 5X. The video that finally did it for me youtu.be/watch?v=3h0XW8ZWzuA Commented Dec 8, 2023 at 12:12
9

Use this code to unlock in an emergency call: *#812#. After calling it, the phone unlocked and I was shown the home screen. After that, I went to the setting and added a new Google account. Since then, the phone works perfectly and thus is absolutely safe.

If you have the same problem, just try it. If it unlocks, then good for you. If it does not, then just nothing happens.

It worked beautifully on my OnePlus2.

3
  • 1
    It worked on a OnePlus3, thank you! Even though this does make me question the safety of the phone...
    – anon
    Commented May 2, 2017 at 5:20
  • 1
    Interesting. On OP2 it seems like a bug to get you to another screen where you can sign in with a Google Account, but not get to the home screen. From there I rebooted and it logged in. I did a factory reset from within Android, rebooted, and resumed setup as I would normally expected. Commented Sep 15, 2017 at 15:42
  • Didn't work on my Samsung A70. Commented Apr 4, 2020 at 21:58
8

No, there is not (or there shouldn't be). Factory Reset Protection uses a protected storage area located at /dev/block/*/by-name/frp that can't be wiped without special privileges or initiating a Factory Reset from Settings. If the user was able to root the device they could manually launch Settings via adb and do the reset themselves, but rooting is typically not possible when you can't even get past the initial setup wizard. If your bootloader is unlocked and/or you've already rooted the device, however, they could overwrite that FRP partition in order to bypass it!

If he sends the phone back to you: Log in with your Google account at the prompt in the Setup Wizard, finish the wizard, and then go to Settings and do the Factory Reset from there (rather than via recovery, etc.).

See this Android Police post for more details on the feature: What Is Android 5.1's Anti-Theft "Device Protection" Feature And How Do I Use It?

5
  • 1
    Isn't there a factory reset option in recovery?
    – Joe
    Commented Nov 3, 2015 at 16:13
  • 2
    @Joe The Factory Reset option in recovery does not remove FRP; only a factory reset from Settings does that. This is to ensure that the user performing the wipe knew how to unlock the device, which is a reasonable proxy for ensuring they were the owner. Commented Nov 3, 2015 at 19:38
  • 1
    Can you please shed some light (possibly verify) on "protected storage area that can't be wiped without special privileges or initiating a Factory Reset from Settings"? I'm asking this because the linked article doesn't contain anything useful regarding it and I flashed the stock image on my Nexus 6 in entirety yet I'm being asked for device verification. I'm wondering now where is this "protected storage" located.
    – Firelord
    Commented Mar 3, 2016 at 21:07
  • 2
    In CM, at least, it's /dev/block/bootdevice/by-name/frp. Commented Mar 4, 2016 at 0:02
  • 2
    So could there be a way clearing that via a custom recovery (e.g. fastboot boot twrp_recovery.img and do something from there – either from within TWRP or via ADB which would then be available)? I'm thinking of Lg G4 email verification bypass cant do anything where your other approach got stuck in step 4 (unknown sources being grayed out).
    – Izzy
    Commented May 29, 2016 at 22:35
2

IF the phone has a Google keyboard, the following may look pretty lengthy but it doesn't require OTG cable or PC so it's worth a try.

  1. Boot your device and select preferred language
  2. Connect to Wi-FI network.
  3. You will be prompted to enter email, then tap on it as if you want to type something to bring up keyboard.
  4. From the keyboard, tap and hold the “@” button until it pops up gear icon to input options like Google keyboard settings, languages.
  5. Choose Google keyboard settings.
  6. Tap on the 3 vertical dots at the right top part of your screen
  7. Now Select the Help & Feedback
  8. From the screen displayed, look for Settings in the text, select it, copy it and tap on the search icon.
  9. You should see Settings menu on the search queries. Tap on it to open device settings
  10. Scroll down to About Phone or About device and tap 7 times on the Build number to enable Developer Options
  11. Return to Settings and open the Developer Options that you just enabled
  12. Allow OEM Unlocking and tap Back two times
  13. Restart your device
  14. Connect your Wi-Fi again. You won’t be prompted to log in the previous Google Account and instead the phone will ask you to ADD a new Google Account. Instead Skip it.
  15. Continue to set up your phone.
2
  • The "@" key doesn't behave that way for me (ZTE Axon 7)
    – Pointy
    Commented May 28, 2019 at 14:20
  • @Pointy That's because your phone is using a different on-screen keyboard, but you may still be able to do this: mess around with your keyboard, looking for something like an option to download themes or more emojis or whatever. This may open a browser on your phone, where you can select some text, and get to the phone's search feature, where you can paste or type SETTINGS and get to your phone's settings screens (then continue from step 10).
    – MGOwen
    Commented Apr 16, 2022 at 2:31
2

FRP bypass for ZTE instructions

  1. Reset the phone and power it back on.
  2. Choose your preferred language, then tap on Start.
  3. Connect the phone to a WiFi network (preferably your Home network).
  4. Skip several steps of the setup until you reach the Verify Account screen.
  5. Tap on the email field, in order to activate the keyboard.
  6. Most ZTE phones come with the Swift Key keyboard, so you need to tap on the keyboard’s menu key.
  7. Select Settings from the menu.
  8. From the Settings menu within SwiftKey select Languages.
  9. Minimize the menu on the screen, then go to the Google search bar.
  10. When prompted to sign in with a Google Account, choose "No, Thanks".
  11. In the Google search bar, type Settings and select it. If the SwiftKey menu pops up again, tap on Got it, then Not Now.
  12. From the Settings menu select Backup and Reset. (read the comment below for Huawei Y5)
  13. From this submenu, choose Factory Data Reset. Go through the entire process and reset your handset again. However, this time you won’t see the FRP lock.

Source: How to bypass Google Account Verification (Factory Reset Protection)

1
  • 1
    Steps 12 and 13 worked for my old Huawei Y5 (Y560?), I just had to get to settings by messing with the on-screen keyboard. Something like "download more emojis" or "help with touch keyboard themes" eventually opened a screen where I could select text, and a search icon appeared in the top right. I clicked that, typed settings, and was able to follow steps 12 and 13 (I also enabled Developer Mode and OEM Unlocking first, so if this fails for you, try those too - they are in other answers on this page).
    – MGOwen
    Commented Apr 16, 2022 at 3:21

You must log in to answer this question.

Not the answer you're looking for? Browse other questions tagged .